Step-by-Step Guide to Creating a Task Tracker App in NotionApps in 2025
A practical walkthrough on building a task tracker app using NotionApps, covering tasks, projects, deadlines, and priorities.
Jan 11, 2026
Managing tasks often means juggling to-dos, deadlines, priorities, and projects across multiple tools. For individuals and teams, this can quickly become overwhelming and hard to stay consistent with. With NotionApps, you can turn simple Notion databases into a fully functional task tracker that’s easy to manage and intuitive to use. In this guide, we’ll walk through how to build one step by step, without writing a single line of code.
Select the Notion databases you want to include and hit Build App.
For this project, the main screens we’ll be creating are:
Projects: A central screen to view and manage all projects, along with their status, timelines, and related tasks.
Active Tasks: A focused view that shows only ongoing and pending tasks, helping users prioritize what needs immediate attention.
Task Calendar: A calendar-based view of tasks organized by due dates, making it easy to plan workloads and track deadlines visually.
Step 2: Set App Identity in Settings
Open Settings in the app.
Rename the app, pick an icon, and update any other identity details.
A clear name & icon help your team recognize the app at a glance.
Step 3: Add Users
From the left sidebar, go to the Users section.
Click on Select User database and choose Teams.
Login method - Email address + Login Code
Email address property - Email
Username property - Name
Turn the Allow users to sign up toggle on.\
Click Confirm.
This will allow you to tag employees whenever stock is withdrawn or added, keeping accountability clear.
Step 4: Remove Old Screens
Go to Screens → Layout, and delete the default screens that were automatically generated from your selected databases. This lets you start fresh and create only the screens you actually need for your app.
Step 5: Build the All Projects Screen
Create a new screen:
Click on New Screen → Select Projects Database → List (Update Items) → Done
Name the Screen → All Projects
Style Settings:
View Type → List
Data Settings:
Title → Title
Description → Due Date
Caption → Category
Color Tag → Dependant on Status ( Completed, In-Progress & Pending ) Each can be set to a unique color for easy Identification.
Behaviour Settings:
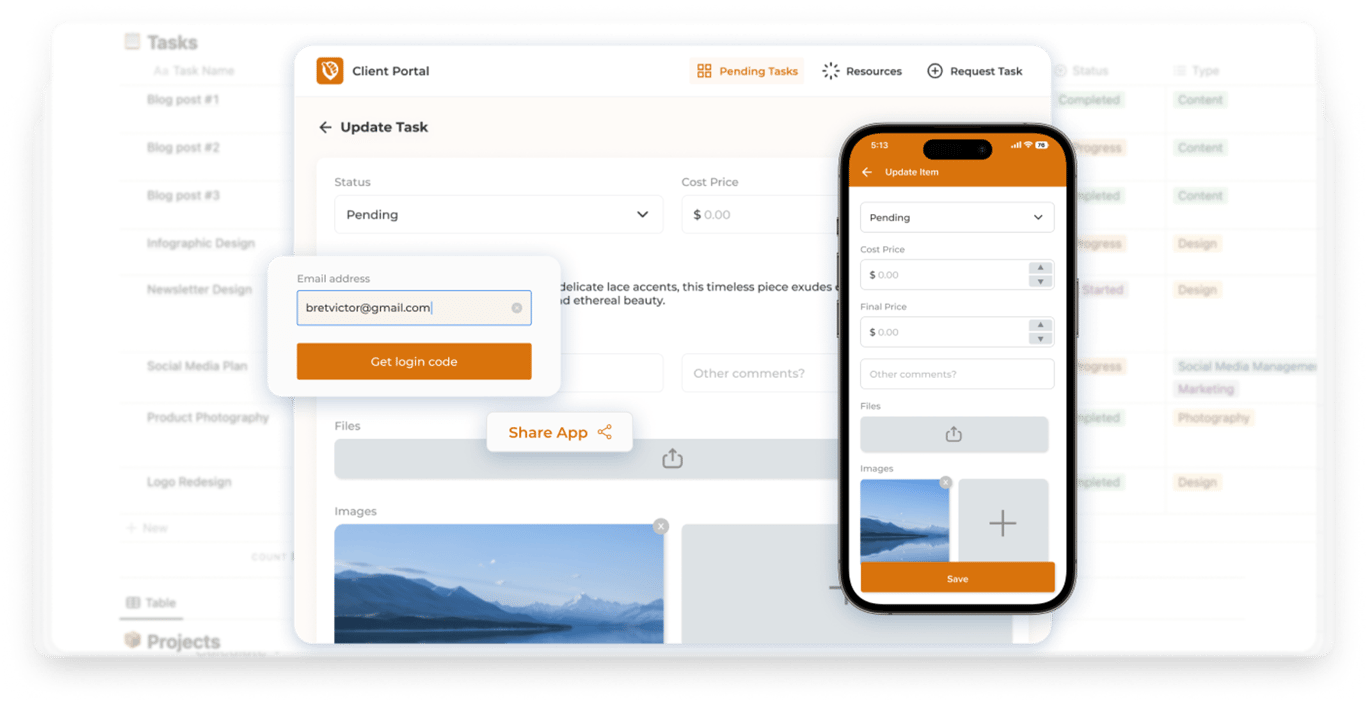
Click on Go to Update Screen, this opens a new screen which allows users to Update details for each project.
Rename the Screen as Update Project
Delete all existing Logics and add the following:
View Title→ Heading
Expand the View Name box and change Subheading → Progress, Tag → Status.
View Name → Heading
Update Title → Text Box
Update Description → Paragraph Box
Update Due Date→ Date Picker
Update Status → Dropdown
Update Notes → Paragraph Box
Update Photo → Photo Uploader
Update Documents → File Uploader
List Task → List
Expand the dropdown to change the Data Property → Tasks, Title → Task Name, Description → Task Description, Caption → Due Date, Color Tag→ Status
Under Behaviours, turn on the On Click toggle, for a screen to update details about the task
List Blocked By → List
Expand the dropdown to change the Data Property → Blocked By, Title → Title, , Caption → Notes, Color Tag→ Status & Image → Photo
Step 5: Build the Active Tasks Screen
Create a new screen:
Click on New Screen → Select Tasks Database → List (Update Items) → Done
Name the Screen → Active Tasks
Style Settings:
View Type → Grid
Grid Column Size → Large
Data Settings:
Title → Task Name
Description → Type
Caption → Due Date
Color Tag → Dependant on Priority ( Medium, High, Low, Critical Priority ) Each can be set to a unique color for easy Identification.
Sorting Property : Sorting tasks by due date ensures the most time-sensitive tasks appear first, helping users stay on top of upcoming deadlines.
Sort By → Due Date
Order → (A-Z)
In-App Filtering : Lets users quickly narrow tasks by due date, priority, type, or project, making it easier to focus on the right work at the right time.
Add the following filter properties according to the Image:
Behaviour Settings:
Click on Go to Update Screen, this opens a new screen which allows users to Update details for each Task.
Rename the Screen as Task Details
Delete all existing Logics and add the following:
List Projects → List
Expand the dropdown to change the Data Property → Projects, Title → Title, Description → Task Description, Caption → Due Date, Color Tag→ Status
Update Task Name → Text Box
Update Description → Paragraph Box
Update Due Date→ Date Picker
Update Status → Dropdown
Update Priority → Dropdown
Update Notes → Paragraph Box
Update Assigned to → Page Selector
Update Documents → File Uploader
List Task → List
Expand the dropdown to change the Data Property → Tasks, Title → Task Name, Description → Task Description, Caption → Due Date, Color Tag→ Status
Under Behaviours, turn on the On Click toggle, for a screen to update details about the task
List Blocked By → List
Expand the dropdown to change the Data Property → Blocked By, Title → Title, , Caption → Notes, Color Tag→ Status & Image → Photo
Under Action, Add an action to allow delete
Step 4: Build the Tasks Calendar Screen
Create a new screen:
Click on New Screen → Select Tasks Database → List (Update Items) → Done
Name the Screen → Calendar
Style Settings:
View Type → Calendar
Default Mode → Month
Turn on the Allow Mode Change toggle on.
Data Settings:
Title → Task Name
Date → Due Date
In-App Filtering : Lets users quickly narrow tasks by due date, priority, type, or project, making it easier to focus on the right work at the right time.
Add the following filter properties according to the Image:
Behaviour Settings:
Click on Go to Update Screen, this opens a new screen which allows users to View details for each Task on the Calendar
Rename the Screen as Task Details
Delete all existing Logics and add the following:
View Task Name → Heading
Subheading → Task Description, Caption → Due Date, Tag→ Status
List Projects → List
Expand the dropdown to change the Data Property → Projects, Title → Title, Description → Task Description, Caption → Due Date, Color Tag→ Status
View Task Description → View Text
View Assigned On → View Text
View Due Date→ View Text
View Priority → View Text
View Name → View Text (Labelled Created By)
View Name → View Text (Labelled Assigned To)
View Notes → View Text
View Type → View Text
List Blocked By → List
Expand the dropdown to change the Data Property → Blocked By, Title →Task Name, Description → Task Description, Caption → Due Date, Color Tag→ Status. All Properties under the Tasks Database.
Step 5: Update Navigation
Go to Edit Navigation and rename your tabs to match your app’s flow.
Update icons for a more intuitive interface.
Step 9: Publish and Share Your App
Once you’ve finished setting up all screens, filters, and layouts, click the Publish button in the top-right corner of the NotionApps builder to make your app live. After publishing, you can use the Share icon right next to it to copy the app link and share it with users.
Conclusion: A Simple, Scalable Task Tracker Built with NotionApps
With NotionApps, building a task tracking app doesn’t require complex tools or custom development. By structuring your tasks and projects in Notion and layering a clean app interface on top, you can manage work, deadlines, and priorities from a single system.
What makes this approach powerful is its flexibility. You can start with a basic task tracker and gradually expand it as your needs grow—adding new views, filters, or project structures without rebuilding everything. Whether you’re managing personal tasks, team projects, or ongoing workflows, this setup adapts easily to how you work.
Once published, your task tracker is ready to be shared and used across devices, turning your Notion workspace into a practical, reliable system for getting work done.
💡Pro Tip: NotionApps already offers a ready-to-use Task Tracker template that you can customize to fit your needs, along with many other templates designed for different use cases. You can access all templates through this link🔗